Both mechanical properties and technological properties of metals are important in metal fabrication. The mechanical properties of metals determine the range of usefulness of the metal and establish the service that can be expected. Technological properties of metals are highly desirable in shaping, forming and fabrication of metals.
Catalog:
Mechanical properties of metals
– Strength
– Ductility
– Hardness
– Impact Toughness
– Fatigue strength
What are the Technological properties of metals?
– Castability
– Malleability
– Weldability
– Machinability
Most common mechanical properties of metals
The mechanical property of metal is defined as the ability of a metal to resist external forces without destroying. Mechanical properties of metals mainly include strength, ductility, hardness, toughness, fatigue strength.
1, Strength
Strength is defined as the ability of a metal to resist deformation under external force without breaking. The strength of metal can be determined by tension test, fixed the test metal specimen on the tensile test machine (Figures-a), applying a steady and incremental axial tensile force without impact, the specimen deforms (Figures-b) until it fractures (Figures-c).
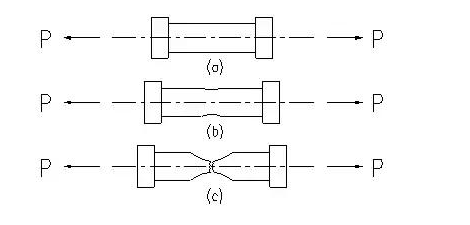
P — tension force(N) ΔL — Change in Length
The tensile testing machine will plot a curve (Figures -d ) which shows the force and the strain or movement that occurs during the test.
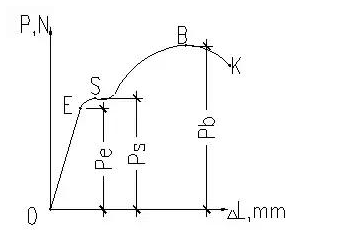
Figures-d
This test provides the elastic limit, elongation, yield point, yield strength, tensile strength, and the reduction in area.
“Quote:
When a sufficient load is applied to a metal, it will cause the material to change shape. This change in shape is called deformation. A temporary shape change that is self-reversing after the force is removed, so that the object returns to its original shape, is called elastic deformation. In other words, elastic deformation is a change in shape of a material at low stress that is recoverable after the stress is removed. When the stress is sufficient to permanently deform the metal, it is called plastic deformation.–CommunityCollege”
OE stage: The specimen will come back to its original dimension when the load is canceled and it will elongate in direct proportion to the tension force.This stage is elastic deformation stage.
The strain generated by metals from elastic deformation to plastic deformation is called the elastic limit(σe).
σe=Pe/Fo
σe — Elastic limit(Mpa);
Pe — the load on the metal enter plastic deformation(N);
Fo — Original cross-sectional area of specimen(㎜2)
ES stage: The specimen would not go back to its original dimension even if the load was canceled and it will continue to elongate but without an increase in the force. This stage is the plastic deformation stage.
During the plastic deformation stage, the specimen has lost the ability of resistance to deformation, this phenomenon is called Yield. The minimum stress when yield phenomenon occurs is the yield point(σs) of the metal and it is the end of the elastic deformation.
σs=Ps/Fo
Note: σs — Yield Point(Mpa);
Ps — load of deformation occurs to the specimen(N);
Fo — Original cross-sectional area of specimen(㎜2)。
Deformation of the specimen will increases sharply with the increasing load after point B, which is the ultimate strength of the material. At point B, the specimen can no longer resist the load and will break at point K. And the maximum stress before the specimen break is call tensile strength(σb).
σb= Pb/Fo
σb — tensile strength(Mpa)
Pb — maximum stress before breaking(N)
Fo — Original cross-sectional area of specimen(㎜2)
Yield Strength(σs), tensile strength(σb) and yielding-to-tensile ratio(σs/σb) are important mechanical properties to evaluate the quality of metals and are also the main bases for design and select materials.
2, Ductility
Ductility is defined as the ability that allows it to be stretched or otherwise changed in shape without breaking and retain the changed shape after the load canceled. Elongation(δ) and reduction of area(φ)are two commonly used measurements of ductility.
1) Elongation(δ): Elongation is calculated by dividing the elongation at the moment of rupture by the initial gauge length and multiplying by 100
δ=ΔL/L0×100%
δ — elongation(%);
ΔL — Change in Length(mm)
L0 — Initial Length(mm)
2) Reduction of Area(φ): Reduction of area is obtained from the tensile test by measuring the original cross-sectional area of the specimen and relating it to the cross-sectional area after failure.
φ= ΔF/F0 * 100
φ — Reduction of area(%)
ΔF — Change in area(㎜2)
F0 — Initial Area(㎜2)
Ductility is positively correlated with elongation and reduction of area. Good ductility of metals is necessary in plastic working.
3,Hardness
Hardness is defined as the ability of a metal to resist penetration by a harder substance. Commonly used measurements include:
1) Brinell hardness:
The Brinell hardness is based on the load applied to the hardened ball in kilograms and press the ball into the surface of the specimen. After removal of the load, the resultant recovered round impression is measured across the indent at right angles using a low-power microscope or an automatic measuring device and the average value used to calculate hardness.
The actual Brinell hardness (HB) is calculated by factoring the indent size and the test force, such that:
HB = 2L / πD/2(D – √(D2 – d2))
L — load,
D — diameter of the ball indenter,
d — diameter of the impression.
Brinell hardness testing is typically used in testing aluminum and copper alloys (at lower forces) and steel and cast irons at the higher force ranges.
2) Rockwell hardness
Rockwell method measures the permanent depth of indentation produced by a force/load on an indenter. First, a preliminary test force (commonly referred to as preload or minor load) is applied to a sample using a diamond or ball indenter. This preload breaks through the surface to reduce the effects of surface finish. After holding the preliminary test force for a specified dwell time, the baseline depth of indentation is measured. The hardness of the specimen is better when the depth is smaller.
Generally, hardness is not only a mechanical property to determine the quality of metals, but also one of the technical requirements for the design of mechanical parts.
4, Impact toughness
Toughness is the ability of a material to resist the start of permanent distortion plus the ability to resist shock or absorb energy.
Toughness is evaluated in terms of impact strength. A metal may possess satisfactory ductility under static loads but may fail under dynamic loads or impact. Toughness is most determined by the Charpy test.
Experiment shows that the toughness mainly depends on the strength of the metal. The higher the strength, the longer the service life of the metal.
5, Fatigue Strength
Actually, the direction and magnitude of the load applied on the workpiece vary periodically. The periodized load is called the alternating load. The phenomenon that a metal workpiece breaks under long-term work under the alternating load is called metal fatigue failure.
The majority of engineering failures are caused by fatigue. Fatigue failure is defined as the tendency of a material to fracture by means of progressive brittle cracking under repeated alternating or cyclic stresses of an intensity considerably below the normal strength. Although the fracture is of a brittle type, it may take some time to propagate, depending on both the intensity and frequency of the stress cycles. Nevertheless, there is very little, if any, warning before failure if the crack is not noticed. The number of cycles required to cause fatigue failure at particular peak stress is generally quite large, but it decreases as the stress is increased. For some mild steels, cyclical stresses can be continued indefinitely provided the peak stress (sometimes called fatigue strength) is below the endurance limit value.
Fatigue strength design is one of the important strength calculations. Improving the structure shape to avoid concentration of stress and improving the surface roughness all can improve the fatigue resistance of the metal workpiece.
What are the technological properties of metals?
Technological properties are those qualities that give information regarding the suitability of metals for various technological operations or processes. Here we will discuss four of them: Castability, Malleability, Weldability, Machinability. These properties are very important in metal fabrication. And all these properties directly affect the technical processes, quality and cost of the equipment and components.
1, Castability:
Castability is defined as the ability of metals to form quality castings in the casting process.
Factors that influence the castability of metals mainly include: fluidity, shrinkage, segregation and so on.
Fluidity -Fluidity is the flowability of molten metal. Metals of good fluidity are easy to fill the casting Mold, and it’s easy to obtain quality castings;
Shrinkage – Shrinkage is a phenomenon that volume and size of the casting reduce during the process of resetting and cooling;
Segregation – segregation is the phenomenon that the produced permanent non-uniform distribution during the re-solidify and cooling process of castings. The segregation will cause a great difference in the mechanical properties of each part of the casting, which decreases the quality of the casting.
Most metals are of good castabilities, such as copper, iron, and so on.
2, Malleability:
Malleability is the ease to form quality forgings in the forging process.
Malleability is the comprehensive embodiment of plasticity and deformation resistance of metals. The better the plasticity, the smaller the deformation resistance, the better the malleability of the metal.
Brass and aluminum alloy have good malleability at room temperature, carbon steel has good malleability by heating; Cast iron, cast aluminum, bronze are hard to forge.
3, Weldability:
Weldability is defined as the capacity of a metal to be welded under the fabrication conditions imposed into a specific, suitably designed structure and to perform satisfactorily in intended service.
One of the main objectives of welding is to create a joint that is free of cracks and that can withstand the stresses placed on it. When nearly any welding process can be used on metal and minimal effort is required to produce a sound weld, the metal is said to have “good weldability”.
Weldability of metal is not an intrinsic property as it is influenced by, there are many factors that influence the weldability of metals. Below are some of the most important ones:
Metallurgy – The science of heating or manipulating metals to produce desired properties or shapes in them.
Welding Process – There are more than 67 welding processes. Various factors set them apart: how the heat and pressure are applied, how much heat and pressure are used, and the type of equipment employed.
Joint Design – The combination of the dimensions required for the welded joint and the geometry of the joint.
Weld Preparation – Weld preparation is a set of techniques to execute prior to welding to prevent defects in the weld. For example, one practice is to clean base metal before welding.
Melting Point – The temperature that must be reached for a solid substance to melt or fuse. When a metal has a medium melting point, it has better weldability.
Electrical Resistance – A metal’s opposition, or resistance, to the flow of electrical current. Metals with a high electrical resistance require more heat energy to weld and this makes them have poor weldability.
Generally, low carbon steel has good weldability. High carbon steel, high alloy steel, cast iron, and aluminum alloy have poor weldability.
4, Machinability
Machinability of metals is defined as the ease with which it can be machined or be cut by machine tools.
Factors influence the machinability of metals mainly include:
– chemical components
– microstructure
– mechanical properties
– physical properties
– cutting conditions
– machine tools used
Generally, metals with proper hardness(170HBS – 230HBS) and enough frangibility are easy to be machined. It will improve the machinability of steel when changing its chemical components(add a small amount of plumbum, phosphorus,etc ) or heating. Copper has good machinability.
Metals are used widely in machinery and shipbuilding. It’s necessary to well know the properties of metals so that we can make right and full use of metals to improve the product's quality.
Source: Large Metal Fabrication Manufacturer — Openex Mechanical Technology Col.,td
(Openex is a leading supplier of large metal machining and fabrication services including custom metal fabrication, structural steel fabrication, sheet metal fabrication, custom welding, steel process, cnc machining, etc. We have successfully completed thousands of custom projects in various industries: machinery, rail transit, power/energy, oil/gas, shipbuilding, bridge construction and so on.)
If you want to get more information about the properties of metals or you want to share your points with us, feel free to contact us at [email protected]
Link to this article:Commonly involved metal properties in metal fabrication
Reprint Statement: If there are no special instructions, all articles on this site are original. Please indicate the source for reprinting.:Casting Wiki,THANKS!^^

